Friday, November 15, 2019

Enclosed Porch

Today's weather was pretty much your average day for early February--sunny, high temp 37 (3 C) up from a morning low of 24 (-3 C).  The twist is that it's actually November 13!  Yep, this is the coldest blast of arctic air this fall and a perfect day to evaluate my newly enclosed front porch.


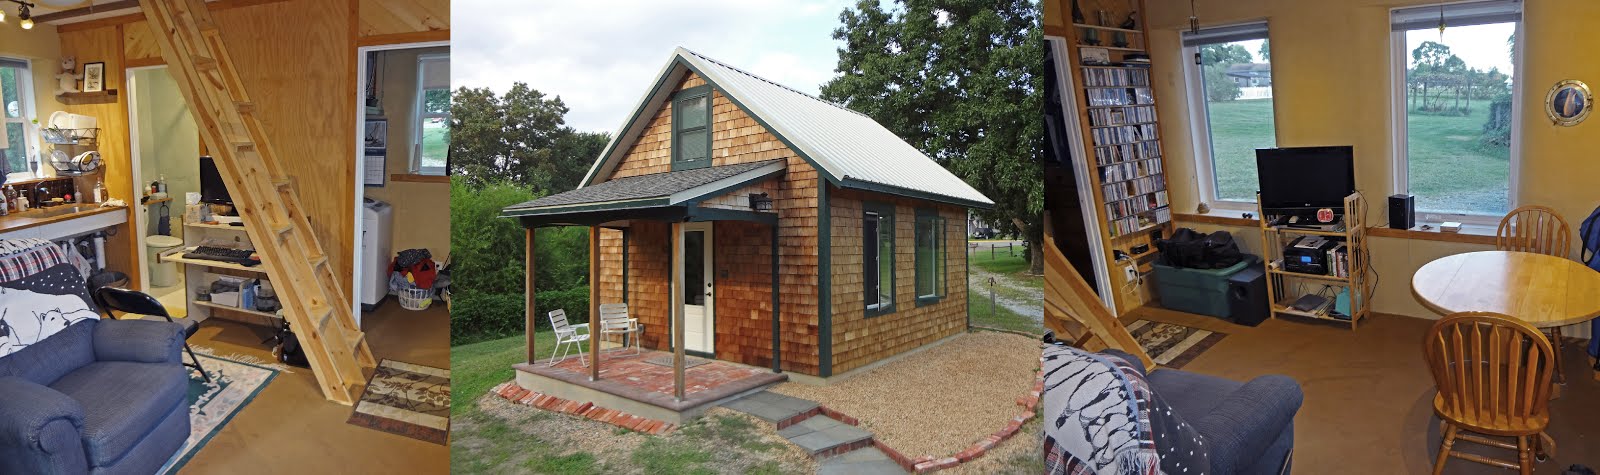
The interior dimensions on the porch are 10' by 6' (3.0 x 1.8 meters).  The shorter gable ends each have a storm door with fixed tempered glass side lights.  The two bays on the long side are skinned with clear vinyl to create a greenhouse-like space.  The porch faces west, and it begins warming up mid morning with the low-angle sun streaming through the shorter front door side.  Temps continue to rise as the sun rotates around to the longer west facade.  On this chilly day, the temp at 2:30 in the shade was 69 inside the porch, while it was 37 outside.  Thirty degrees of free temperature boost is pretty darn cool... I mean hot!  Time for a late lunch in the hammock chair (thanks Andy and Kim!)

The rather unique aspect of the porch is that the clear panels get swapped out for screens in the warmer months  Whichever set isn't in use gets rolled up and stored in the garage attic, and the process takes about 20 minutes. 

As an aside, this photo shows my new steps up from the driveway to the porch.  Departing from my usual DIY approach, I hired a local mason to do the job, and I'm thrilled with the results. 

The porch was always a key aspect of the design, and I regret that it's taken 2.5 years to get it finished. Both storm doors include roll-up screens so I can control the ventilation as easily as opening a window.  This is particularly important in the swing seasons.  In summer, I love being outside and bug-free.  The porch roof serves to shade the west facade from the intense heat of the late afternoon sun, before it dips below the treeline.

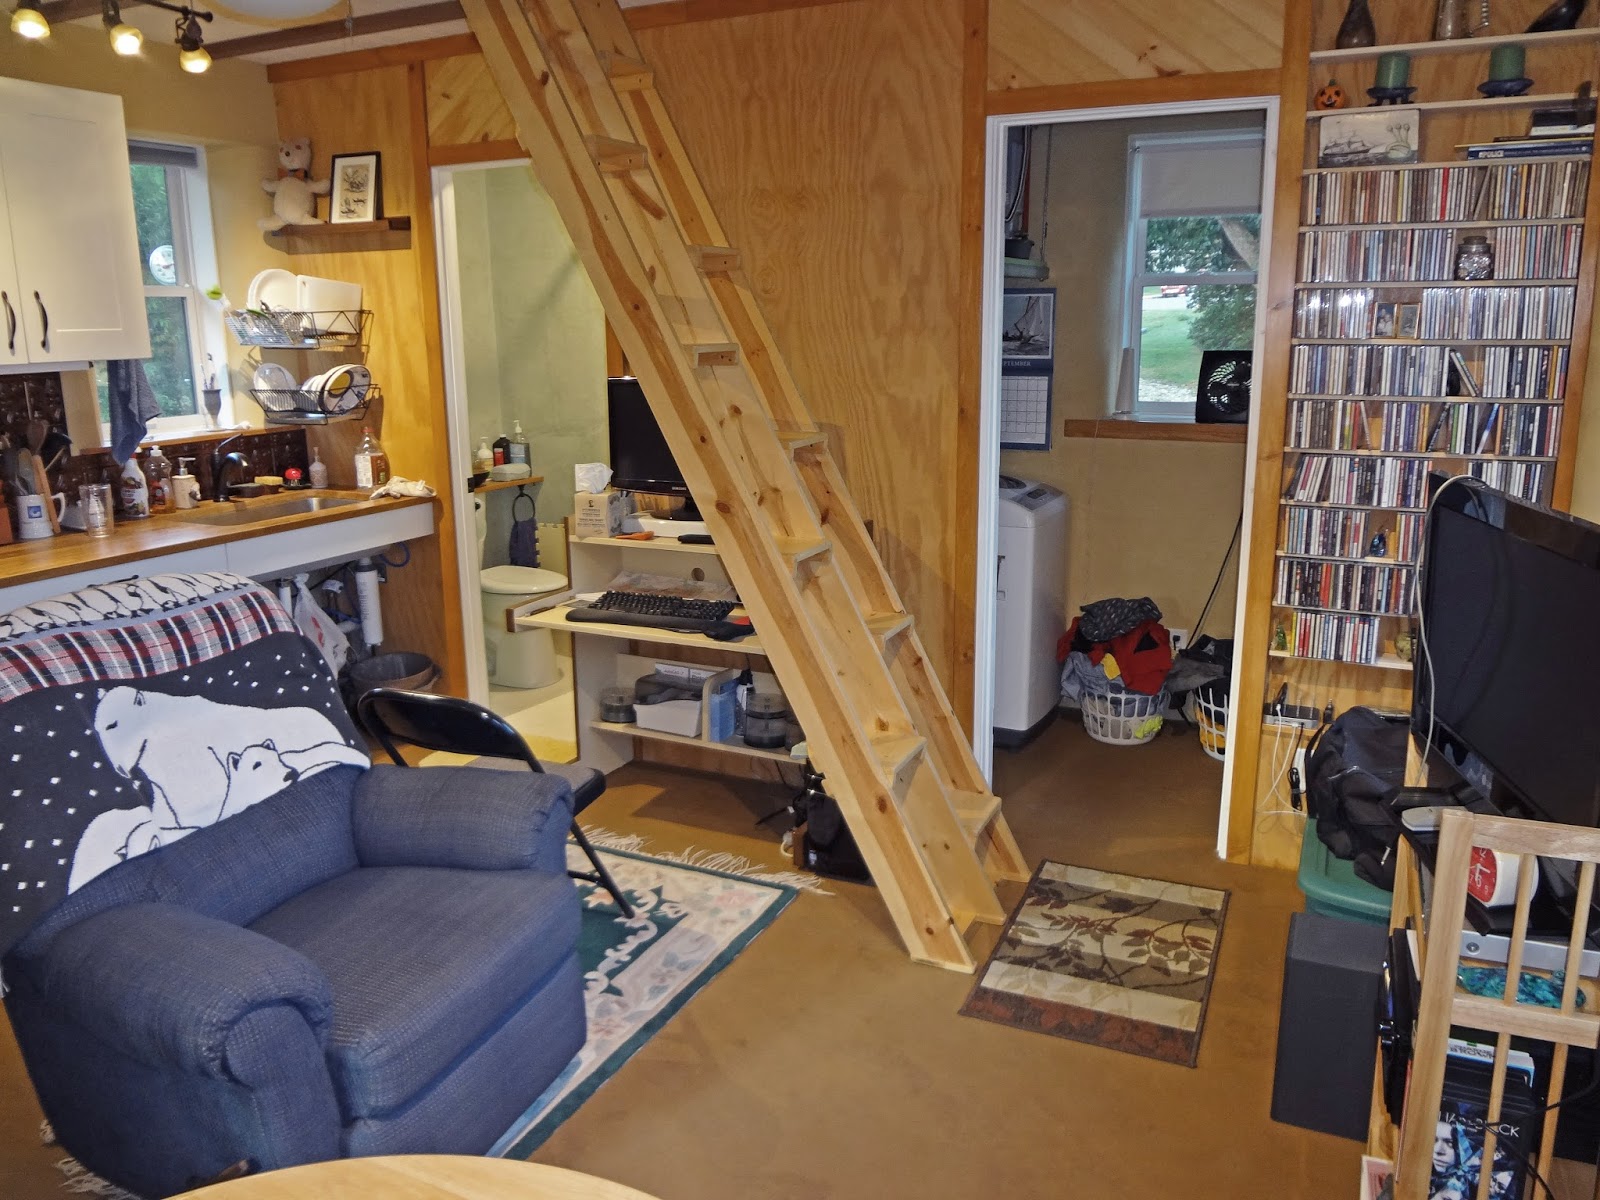
In the winter, the space serves as an airlock to minimize the amount of cold air that comes into the house when the door is open.  On those rare occasions when I'm home and it's warmer on the porch than inside, I can use a fan to blow that free heat inside.  It's also great to dry my laundry on the porch to keep the clutter and moisture out of the living space since I don't use a dryer.

This fall I've been enjoying a quiet moment in the swinging chair around sunset to enjoy the birds and sky.  Even 5-10 minutes makes for a nice mood adjustment after work.  The porch is a relatively inexpensive space that has a significant benefit to the overall enjoyment and livability of the house.

Tuesday, January 15, 2019

How Much Did the Practice House Cost to Build?


Short answer: $74,767. 


Long answer: that comes out to $178 per square foot, which is based on a floor area of 420 s.f., which needs a little explaining.  When measuring the area of loft space, my protocol is to count square footage wherever there is 3’ of headroom or more (since I need 3’ to sit up straight).  In the practice house, the loft measures 132 s.f., but that leaves 66 s.f. of uncounted space near the knee walls that is finished and heated/cooled.

Also, these costs and the $178 per s.f. don’t account for the value of my time.  If I was employed as a semi-skilled construction contractor and I made $20 per hour, my time would be worth $31,440 and the cost becomes $105,207 or $253 per s.f.  If I paid professionals to do what I did (let's assume they would take 3/4 as long to do the same amount of work), the cost works out to something like $129,000 or $307 per s.f.

It’s difficult to compare my cost to build to other homes, but here are a few relevant thoughts;

·       Professionally built tiny homes on wheels seem to run $75,000 to $80,000 for 350 s.f. with loft
·       I saw a premanufactured tiny home for sale in 2017 discounted to $60,000 not including transport and foundation
·       Conventional homes in MD seem to run about $150 per s.f. (or $63,000 for 420 s.f.) , but that is a tough comparison because the more expensive kitchen and bath areas make up a larger percentage of costs in a tiny home.  Also, my house has a high performance shell, with a higher up-front cost versus lower operating costs.
·       Two internet sources listed custom natural homes as costing roughly anywhere from $75 to $300 per s.f., so I guess I fall near the high end of that range.

There are of course, a few particular choices I made that drove up my costs as compared to the conventional construction that runs $150 per s.f..  The idea is that money spent upfront would save time and hassle over the long term, and my goal was to never have to touch the exterior for 50 years except to refresh the trim paint and recoat the shingles.  Collectively, these items probably added about $10,000  or 15% to the cost:
·       Metal roof rather than asphalt shingles
·       Cedar shake siding rather than cement board
·       Spray foam insulation rather than rockwool bats
·       TrueExterior trim rather than PVC (http://truexterior.com/)
·       Professionals to help with siding and light straw clay when I was time-constrained

Of course, none of the costs in this analysis include the price of land or utility extensions to the house, since those vary considerably by location.  And similar to what I noted in my “Time to Build” post, there will be a little more money spent when I enclose the porch.  I acted as my own architect and civil engineer, which probably saved me $6,000 or so.  I also spend about $1,800 on tools and equipment to supplement my existing arsenal so that I could do my own work.  

Overall, I was anticipating the costs to come in lower than they did, but I had zero prior experience with any sort of home-building, let alone natural home-building.  But on the flip side, I ended up with a better home than I expected, and it is by far the most comfortable and best suited to my lifestyle of anyplace I have ever lived.  As I try to answer the age-old question, “was it worth it?” I think the answer is yes, provided that the place turns out to be as low-maintenance as I expect it to be.

How Much Time Did I Spend building?


By one measure, it took me 2 years plus a week to build the house from breaking ground (July 8, 2015) to moving in July 15, 2017.  Of course, the house wasn’t 100% done when I moved in, and I have been picking away at interior trim, shelving, coat hooks, etc. in between work, travel, and other projects. 

In any case, I wanted to tally up the amount of time I spent working on the house thus far.  Sure, it’s not the complete picture, so I suppose I’ll have to come back to this discussion when I’ve completed all the major tasks.  So the big number is… 
1,572 hours!  
If I’d been working 40 hours a week, that comes out to 39.3 weeks or 9.4 months.  That’s also about 70% of the total time spent building the house if you total up all the time I paid for contractors to do their thing (694.5 person-hours). 

If you’re interested in drilling down into those numbers, check out the table for a breakdown of that time by task, and I’ll try to put these into context:

·       I would consider myself to be semi-skilled labor.  I accomplished most tasks to a contractor-level of quality, without many mistakes, but I am certainly much slower than a professional.
·       I was not able to work a “full day” most of the time.  That leads to inefficiencies because it’s harder to maintain an efficient rhythm, and if you have the same setup/cleanup time whether you work 4 hours or 9, you get less accomplished working a partial day.
·       On average, I worked 5 hours on the days I made it to the house, but that varied from half an hour to 14.5 hours on the longest day.  During the build, I was working between ½ and ¾ time at my “real” job of civil engineering, so that limited and broke up the time I spent at the Practice House.  For better or worse, civil engineering was the #1 priority and the Practice House was #2.
·       The percentage of time listed in the chart is based on the combination of my time and the contractors’.  You can get a sense that I did most of the natural building tasks, and the contractors did most of the conventional construction tasks.
·       There is a hefty dose of my learning curve involved in my numbers.  In particular, I spent way more time than I should have fixing cracks in the first two layers of adobe floor because I didn’t get my clay/sand ratio right.
·       I also wasn’t sure of what level of finish I would be comfortable with.  For example, I spent considerable time on the finish coats of plaster, making them as flat and uniform as my patience would allow. At the time, I was a little frustrated that they still seemed wavy and rough.  But after stepping back and now living in the place, I think they look fantastic!  I probably could have cut my time in half on the final layers in retrospect if I’d known that the material is so forgiving of a rustic look and that I would enjoy the result.

One major caveat is that I’m still not “done”.  The biggest pending project is to enclose the front porch with screened panels in summer, and clear acrylic panels in the winter.  This will be a significant improvement to the use and functionality of the house, so I plan to revisit these numbers once the porch is finished.

Monday, January 14, 2019

Electric Expenses


I thought you all might enjoy knowing what I’ve spent on electricity in a passive solar, highly insulated, and thermally massive compact home.   On average, it’s been $37.80 per month over the 18 months I’ve lived in the Practice House:
 
That covers heating, cooling, cooking, and hot water—the house uses no fossil fuels (and nothing that is explosive). These figures even include small projects and lighting in my shop.

As an aside, I looked into adding a solar array on my new garage to go net-zero, but a shading issue makes that payback time relatively unattractive.  For the short term, I have signed up with a community based solar program, so I am buying power that is being generated by solar panels located on a farm located nearby in Queen Anne’s County.  Once I build the main house on the property (the Practice House is the guest house), I will re-evaluate building my own solar array.

Snow Glacier on My Roof

One cool product on the Practice House that I really love are the Rainhandlers, which take the place of traditional gutters.  I’ll give you a technical discussion of rain handlers below, but first I wanted to share pics of last night’s snow sheeting off my metal roof, curving around the Rainhandlers, and freezing in place.  Fun stuff!


There are so many downsides to gutters, but top of the list for me is the PIA factor to clean them out, and the fact that they can hide or exacerbate rot and other problems relating to the fascia trim at the edge of a roof.  On a new structure, if you’re willing to install them yourself (which is easy if your roof is easily accessible), they are more affordable than traditional gutters as well.

With Rainhandlers, in a nutshell, rain that sheets off the roof, hits a series of curved blades (similar to venetian blinds) and sprays out in a fan pattern rather than dripping down in a straight line.  This avoids creating a washout under the edge of a roof that has no gutter, and it avoids concentrating flow from a traditional gutter/downspout that may lead to erosion around your foundation.  Spreading out roof runoff is an important principle of low impact development, so in jurisdictions where houses are subject to stormwater management regulations, this may reduce or eliminate the need to build treatment practices like rain gardens.  For more info, check out rainhandler.com

(Incidentally, the closeup shot also shows off the fabulous job the carpenters did with the trim under the roof overhangs.)

Wednesday, December 5, 2018

Coat Hooks

Sorry for the long silence!  I've been distracted with other projects, lots of work, and a long sailing adventure, but I'm starting to devote some more time to finishing up the little details of the interior.  Here is the coat rack I just installed:


The wood assembly is made of stained pine, which mimics the other trim in the house.  Three metal hooks are screwed to the wood, and the whole assembly is screwed to the wall.  This is not particularly noteworthy, but if offers an opportunity to talk about various procedures to hang things on the walls in a natural house.

Reminder: the interior walls have about 1/2" of clay plaster on top of 3.5" of Light Straw Clay, which is packed between conventional 2x4 studs.  This is somewhat analogous to drywall in that if you want to hang something heavy, you'd better find a stud.  Clay plaster by itself, like drywall, is limited in the weight it can safely support.

The coat rack may have to carry 15-20 pounds, so it is screwed into two studs.  Fortunately, I was thinking ahead and marked all the stud locations before plastering over them.  In my house, you just need to push up the ceiling panels, and my marks are visible in the plywood that lines the perimeter of the cavity between the first floor ceiling and attic floor.  Use a plumb bob to project the marks down to the portion of the wall where you are looking to drive a screw.  (Fortunately, I hired expert framers and this house is amazingly square, level and plumb!)

I used 2-inch long #8 screws that are counter-bored into the pine, meaning they bite 1" into the studs (1" bite + 1/2" of plaster + 1/2" of wood = a 2" screw).  1" of bury is more than really necessary, but 1 1/2" screws would have only had 1/2" of bury, and that would have left me a little nervous.  I drilled a pilot hole for the screw and didn't bother with drilling a clearance bit through the plaster--it is soft enough that the screw drives right through the plaster with minimal effort.

I've only hung a few pictures and paintings where the weight is carried by the plaster.  The super-light one is just hung on a nail.  The medium one is on a standard hook nailed into the plaster, and the biggest, heavy painting has twin hooks nailed into 2 studs.  My intuition says that the clay plaster has maybe 1/2 to 2/3 the carrying capacity of drywall, which means you should choose a bigger nail/hook than you would for a conventional wall.

There's nothing significant about any of that, except that I was a little nervous about nailing into the plaster, worrying that it might be brittle and crumble.  Point #1 is that I did the nailing in the summer when the air is more humid and perhaps the clay is a softer and less brittle.  Point #2 is that I used a small paintbrush to wet the wall where I was going to drive the nail.  And I kept re-wetting it every 5 minutes or so for 20-30 minutes to pre-soften the clay.  At this point ,the nails drove in quite easily, and I let the clay dry completely before hanging the art on the hook.

With this methodology, it took a little longer to hang the art than it would have with a conventional drywall wall, but there have been no oh-crap moments.  If I had mock-up Light Straw Clay and drywal wall sections, I would do some destructive testing where I installed different size nails and hooks and hung weights on them until the fittings pulled out.  Alas, I wasn't thinking ahead on that, so that will have to wait until the next project.


Tuesday, September 26, 2017

Mostly Moved In

I moved in about two months ago and have been working on some of the small details: interior trim, shelves, shades, etc.  I'm happy to report that I DO NOT FEEL CRAMPED!  In part, that is due to my strategy of only moving in the things I need for the space I have available.  Trying to downsize from my old cottage by just emptying the old place (800 sf plus attic) and trying to stuff it into 420 square feet would have resulted in an entirely different outcome.  So please enjoy the following photos and consider what's done and what is yet to be finished:

Not much new on the outside, except that the porch is functional.  There is still plenty of
of work to be done here to add storm doors and acrylic panels to close off the space
into a semi-greenhouse.  This will act as an airlock and give some free heat on
sunny winder days.  Next spring, I'll swap out the acrylic panels for screens.


All furniture is a place-holder for now.  The table will be slightly larger and square;
the chair will become a love seat (the table and love seat will swap locations); I'll get a proper
media cabinet, and replace the green storage tub with a chest.  The insulating blinds on those
large south side windows keep the warmth in during the winter and with the top-down feature,
they keep out solar heat gain on unusually warm September days while leaving a view out the
upper part of the window.
I wasn't quite sure I'd be able to fit my computer desk.  Luckily,
it nestles in nicely under the stairs so I can work comfortably
from home.  I have a 20"x30" folding table that sets up to the
left of the desk if I need more horizontal space.


Detail of the CD shelves that are built into the wall.
This also shows off the diagonal tongue-and-groove
pine over the door vs. the lightly stained plywood
which makes up the large panels.  I hate drywall:
the plywood makes it easy to securely fasten shelves
and paintings anywhere on the wall with fewer studs.


Coming soon: a curtain to cover the pantry shelves to the left of the fridge.
A door here would swing against the wall and preclude adding a
coat hook/shelf, which is also on the to-do list.  It's hard to see in this shot,
but there is no cabinet under the sink--it's just open to maximize
 room for trash, recycling, and cleaning supplies.  A curtain is also in the works there.
Ben's perch gives him a commanding view of the
diminutive space.  The hanging dish drains act as
permanent storage for my every-day dishes--it
saves time to not put them away and take them
out repeatedly.  The racks drain into the sink,
sort of like a European kitchen.


Imagine a row of shelves above the toilet for
towel storage and the stuff that usually belongs
in the bathroom.  The frame on the left encloses
the medicine cabinet.  A traditional mirror wouldn't
work here since the toilet is located where you would
stand to see yourself.  But when you  are in the middle
of the room and open the door, a mirror on the inside
of the door swings into the perfect position.  


I LOVE this shower, especially in warm weather.  Flow control on the left lets me soap up and turn off the water to avoid getting the room all hot and humid before I rinse off.  There is no guesswork about finding the perfect temperature because the knob on the right controls that precisely: set it and forget it.  It's a little unusual to have towel racks on the door, but it works.
I try to use as much of the wall cavity as possible.  This shows
the back side of the tongue-and-groove.  Same think in the
closet, too.  That's a home-made shower rod: one 10' piece of
copper pipe for $15.  Wish I'd been able to bend it smoothly,
but I didn't figure that out.  The 36" x 40" area inside the shower
curtains is cavernous compared to most bathtubs.


This mid-size washer is perfectly sized to fill up
my drying rack plus a few shirts hanging
on hangers to dry.  I haven't used a dryer since
college, so this is no hardship.  I'm working on
a curtain to cover this doorway (or should I go
with some hippie beads?)  Yet another curtain
will hide the two water heaters (for domestic
and 
radiant floor heat).


I have a room-darkening blind ready to hang once the air
conditioner comes out (any day now!)  The counterweight is
designed to provide a soft close for the hatch as well as to
hold it open and out of the way.  The door will even stay open
45 degrees to funnel air-conditioned air downstairs on a hot day.
The shelves along the side of the attic are designed to
hide banker's boxes 
underneath as my module of storage.  Some day, I may build a  platform to raise up my foam
mattress 8-12 inches.  That would provide some more
storage, and there is just enough headroom for it.  I may
not feel it's necessary. Note the room darkening blind
on this side--I love the side rails that exclude virtually
every once of light!  (Photo was taken at 5 PM with
full western sun on the window.)