Tuesday, September 26, 2017

Mostly Moved In

I moved in about two months ago and have been working on some of the small details: interior trim, shelves, shades, etc.  I'm happy to report that I DO NOT FEEL CRAMPED!  In part, that is due to my strategy of only moving in the things I need for the space I have available.  Trying to downsize from my old cottage by just emptying the old place (800 sf plus attic) and trying to stuff it into 420 square feet would have resulted in an entirely different outcome.  So please enjoy the following photos and consider what's done and what is yet to be finished:

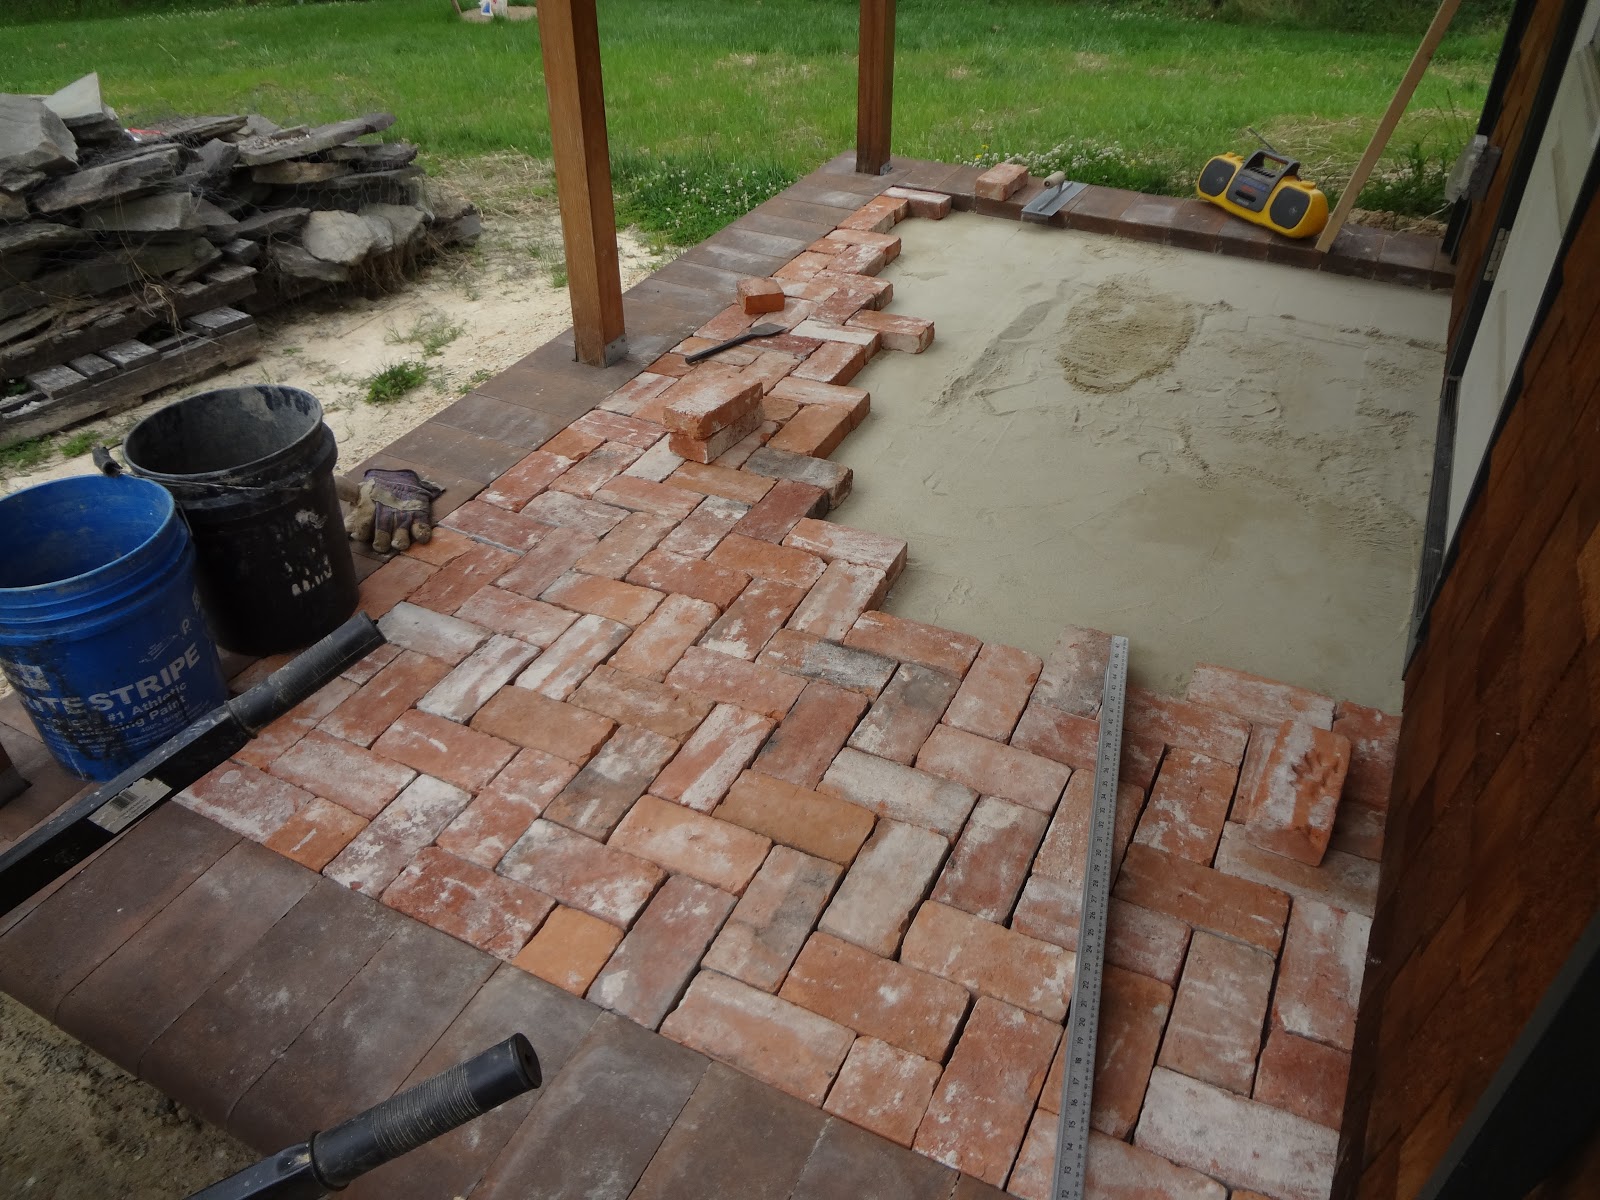
Not much new on the outside, except that the porch is functional.  There is still plenty of
of work to be done here to add storm doors and acrylic panels to close off the space
into a semi-greenhouse.  This will act as an airlock and give some free heat on
sunny winder days.  Next spring, I'll swap out the acrylic panels for screens.


All furniture is a place-holder for now.  The table will be slightly larger and square;
the chair will become a love seat (the table and love seat will swap locations); I'll get a proper
media cabinet, and replace the green storage tub with a chest.  The insulating blinds on those
large south side windows keep the warmth in during the winter and with the top-down feature,
they keep out solar heat gain on unusually warm September days while leaving a view out the
upper part of the window.
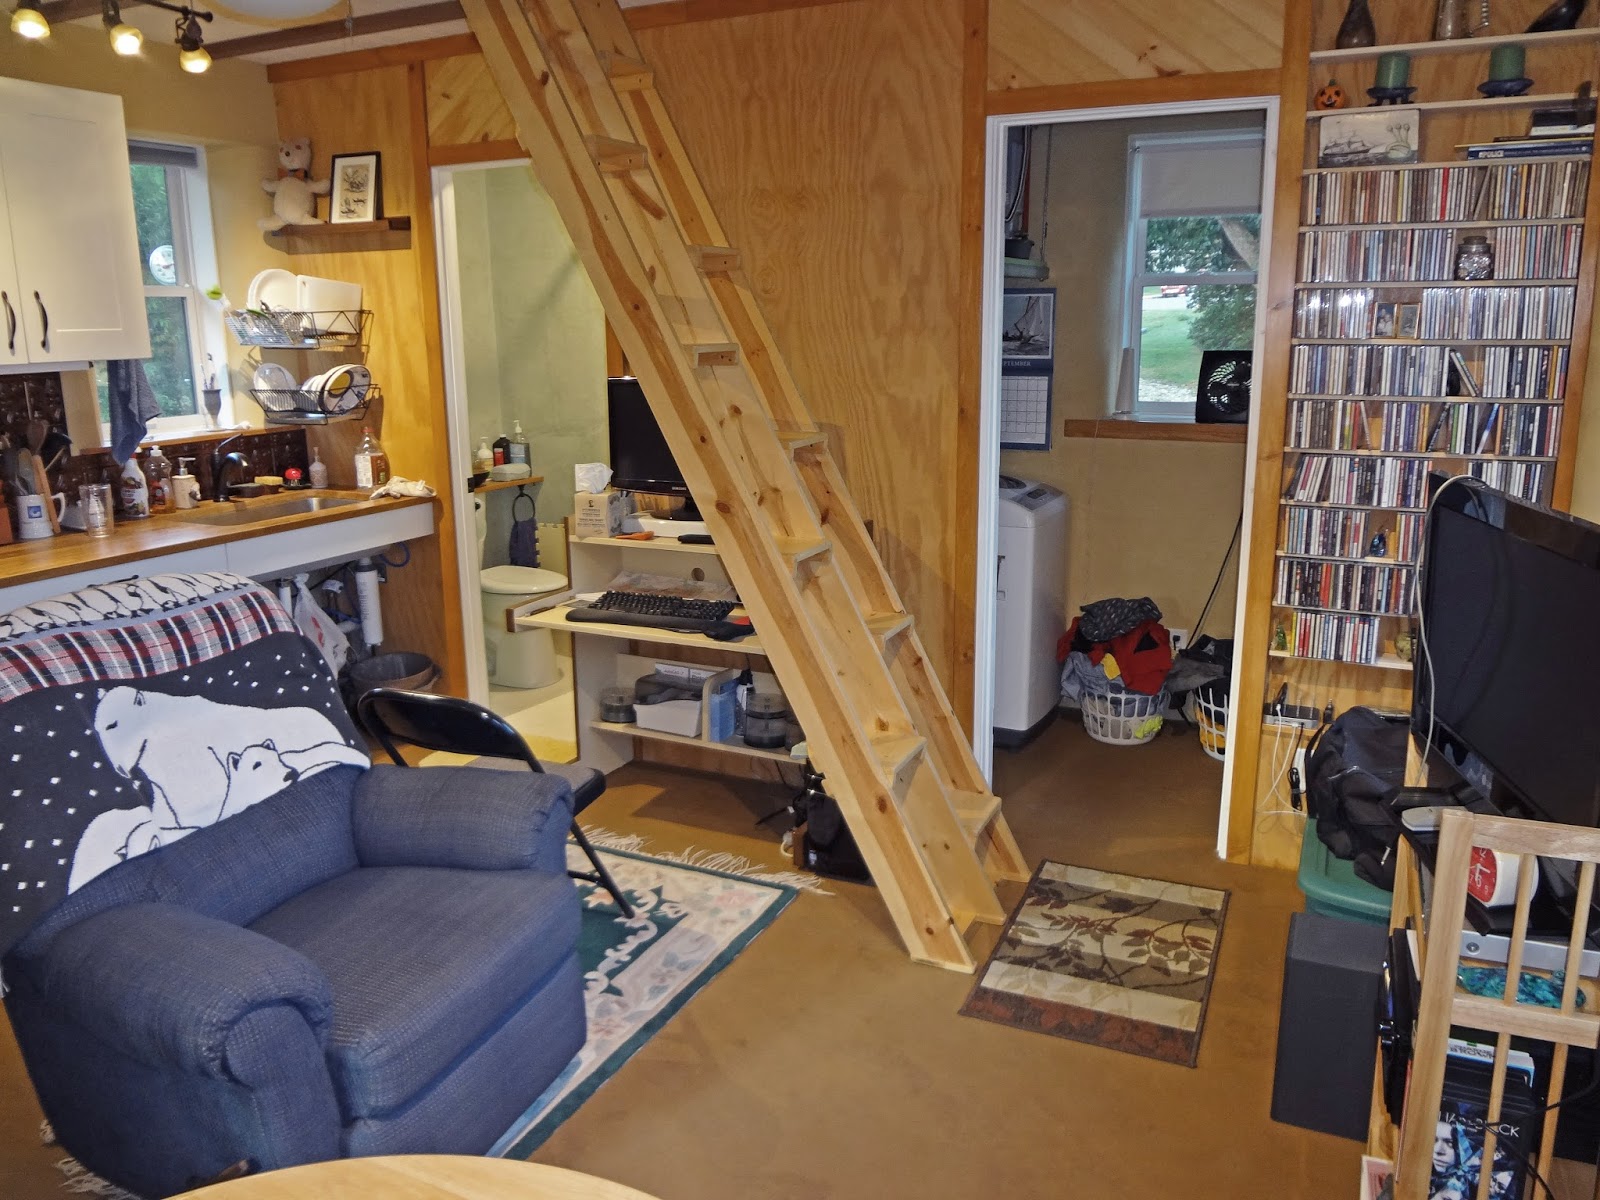
I wasn't quite sure I'd be able to fit my computer desk.  Luckily,
it nestles in nicely under the stairs so I can work comfortably
from home.  I have a 20"x30" folding table that sets up to the
left of the desk if I need more horizontal space.


Detail of the CD shelves that are built into the wall.
This also shows off the diagonal tongue-and-groove
pine over the door vs. the lightly stained plywood
which makes up the large panels.  I hate drywall:
the plywood makes it easy to securely fasten shelves
and paintings anywhere on the wall with fewer studs.


Coming soon: a curtain to cover the pantry shelves to the left of the fridge.
A door here would swing against the wall and preclude adding a
coat hook/shelf, which is also on the to-do list.  It's hard to see in this shot,
but there is no cabinet under the sink--it's just open to maximize
 room for trash, recycling, and cleaning supplies.  A curtain is also in the works there.
Ben's perch gives him a commanding view of the
diminutive space.  The hanging dish drains act as
permanent storage for my every-day dishes--it
saves time to not put them away and take them
out repeatedly.  The racks drain into the sink,
sort of like a European kitchen.


Imagine a row of shelves above the toilet for
towel storage and the stuff that usually belongs
in the bathroom.  The frame on the left encloses
the medicine cabinet.  A traditional mirror wouldn't
work here since the toilet is located where you would
stand to see yourself.  But when you  are in the middle
of the room and open the door, a mirror on the inside
of the door swings into the perfect position.  


I LOVE this shower, especially in warm weather.  Flow control on the left lets me soap up and turn off the water to avoid getting the room all hot and humid before I rinse off.  There is no guesswork about finding the perfect temperature because the knob on the right controls that precisely: set it and forget it.  It's a little unusual to have towel racks on the door, but it works.
I try to use as much of the wall cavity as possible.  This shows
the back side of the tongue-and-groove.  Same think in the
closet, too.  That's a home-made shower rod: one 10' piece of
copper pipe for $15.  Wish I'd been able to bend it smoothly,
but I didn't figure that out.  The 36" x 40" area inside the shower
curtains is cavernous compared to most bathtubs.


This mid-size washer is perfectly sized to fill up
my drying rack plus a few shirts hanging
on hangers to dry.  I haven't used a dryer since
college, so this is no hardship.  I'm working on
a curtain to cover this doorway (or should I go
with some hippie beads?)  Yet another curtain
will hide the two water heaters (for domestic
and 
radiant floor heat).


I have a room-darkening blind ready to hang once the air
conditioner comes out (any day now!)  The counterweight is
designed to provide a soft close for the hatch as well as to
hold it open and out of the way.  The door will even stay open
45 degrees to funnel air-conditioned air downstairs on a hot day.
The shelves along the side of the attic are designed to
hide banker's boxes 
underneath as my module of storage.  Some day, I may build a  platform to raise up my foam
mattress 8-12 inches.  That would provide some more
storage, and there is just enough headroom for it.  I may
not feel it's necessary. Note the room darkening blind
on this side--I love the side rails that exclude virtually
every once of light!  (Photo was taken at 5 PM with
full western sun on the window.)


Tuesday, June 20, 2017

Toilet Hand-Wash Basin

One of the space-saving features in my bathroom is that there is no sink.  There are toilets for sale that incorporate a hand-wash basin in the back of the toilet (check out caromausa.com).  When you flush, the water that refills the tank is routed through a faucet, giving about 30 seconds to wash your hands before the tank is full and the flow shuts off.  The basin simply drains into the tank, meaning the grey water from washing your hands is used for the next flush.  There are also kits for sale that allow one to retrofit most toilets in a similar fashion.

I ended up building as solution that functions the same way using an Ikea salad bowl as the basin.  I like that I have a shelf the entire width of the bathroom to maximize the amount of available horizontal space.


Building Codes require that a bathroom have a sink available with warm water.  This turned out to be the only sticking point in getting my building permit since a conventional toilet is only plumbed with a cold water supply line.  The solution was to add a mixing valve so the water that fills the toilet tank via the faucet is automatically mixed to come out warm.  This should have the benefit of keeping the toilet tank from sweating as much in the summertime.  One unintended and undesirable consequence of this is that the valve seems to reduce the pressure to the faucet, so it is pretty much just a trickle when it comes out.  The video shows it in action, but be aware that I didn't shoot for the entire 30-second fill cycle in case you don't have sufficient bandwidth to download a long video.


Monday, June 12, 2017

Steps up to Porch

Not much to say here, I'll let the photo captions speak for themselves. 
Laying out three steps.  Each one will have four stones, and
  they will be angled slightly as they drop down to driveway level

With the location of the bottom step established, I set a level stick in place to
measure the total drop down from the porch.  Accounting for a 1/4" per foot
 slope on each step (for drainage), that left two risers at 4.5" each.
(Ignore the bucket-- it is only there to prop up the sticks for the photo.)

All three steps boxed out and compacted.

Beginning to bed the steps in 1-2" of sand

Laying the bricks that form the risers.  The four flat bricks in front are just to
provide extra weight to hold the vertical bricks in place while I compact
 the sand behind them.

Everything in place and getting ready to sweep sand into the joints
Ready for action!

Sunday, June 11, 2017

Front Porch

As much as I would like to delve into masonry work, I've been impatient to move things along, and there were going to be a couple tricky things involved with building the front porch.  Time to hire a professional!


All formed up with rebar ready to place in the bottom of the perimeter walls.  Tricky item #1 was to get the concrete to abut the house at just the right height to work with the green trim board on the side of the house.  That green trim is where the screen/acrylic panels will form the porch enclosure.

Pouring the wall.  Tricky item #2 was that the cylindrical concrete post footers did not line up very well.  After some debate, we decided to line up the wall even with the post that is farther away in this shot and trim off a portion of the one that is closer.   That was some challenging work with the masonry saw, which the contractor performed flawlessly.

The walls have cured and bull-nose pavers have been installed.  Tricky item #3 was trimming the bull-nose around the posts and dealing with the mitered corners that overhang the wall.  Notice the temporary shims and blocking to hold the corner pieces in place while the adhesive cures.  I can't praise the contractor enough about what excellent work they did.  A week after this shot, they came back and parged the walls to create an attractive finish.  I don't have a specific shot of that, but you'll see the parging in the last photo.

The pea gravel in the previous shot was leveled out about 3 inches below the top of the bull-nose.  It was then compacted with the hand-tamper in the same way I did under the adobe floor in the house.  This shows a filter fabric on top of the base layer of stone to separate the sand layer that goes on next.  Without the fabric, the sand would migrate into the voids between the gravel and allow settlement of the porch floor over time.  The fabric allows water to drain through, so even if I get some wind-driven rain on the porch, it can migrate its way into the ground.  This show shows some shovel-fulls of pea gravel holding the fabric in place temporarily in preparation for loading in the sand layer.

The sand layer is in place and I'm starting to level it out with the 2x4 screed and rectangular trowel.  Note the one brick in place to establish the level of the sand and the hand tamper to make sure it will provide a firm base for the bricks.

Beginning to install the bricks in a herringbone pattern.  Herringbone can also be installed on a 45 degree angle that is really cool, but that is a lot of work with a masonry saw that I'm just not interested in doing.  (This is supposed to be a low-carbon house, after all and masonry saws burn gas!)  With this pattern, I only needed to cut 12 bricks in half do do the entire floor.  And speaking of low-carbon footprint, these bricks are from Baltimore row homes built between 1850 and 1870 that have been demolished.  I got one surprise brick that has the footprint from some large dog baked into it!  I set this in a place of honor in front of the front door.  Unfortunately, I don't have a photo so you'll have to come see it in person.
This shows me extending the pattern the length of the porch to determine if I would need to trim the bricks at the far end to get them to fit inside the bull-nose.  Luckily, there was only about a half inch gap at the far end, and I could adjust the bricks slightly to have a minimally  larger gap and avoid lots of trimming.  I'd like to praise the professional masons again for their forethought, but this is more likely just another instance of Layden Luck.  The same thing happened with the short dimension: I ended up with an extra 1/2" gap between the bricks and the house foundation.  In this case, I just left the larger gap and added more sand to fill the joint, which is mostly hidden by the siding anyway.
Pounding the bricks to help them settle into place.  Actually, I pounded the wood block sitting on the bricks to avoid damaging them.  Boy, talk about a forearm workout, and I'm ambidextrous so I was alternating arms!
Sweeping sand into the joints.  The gaps are pretty small, so this required more persistence than I had pictured to fill them up.  Dry sand is definitely easier to work with, and mine was a little damp.  I expect to have to come back and touch this up periodically as the sand continues to migrate due to foot traffic wiggling the bricks a little bit.
All ready for a chair and a beverage!  It feels pretty decadent to have an easy step into the house, rather than the various cobbled-up arrangements I've been using for the past two years!

Saturday, June 10, 2017

Kitchen Cabinets

I'm not a fan of particle board.  The main complaint is the glue that is used to stick all those little pieces of wood fiber together, which usually contains formaldehyde.  I investigated a company that produces semi-custom, environmentally sustainable cabinets and found that one base cabinet would run about $1,500. Yikes, talk about sticker shock!

Well, for just two hundred dollars more, I got my entire kitchen at Ikea and saved money by transporting it home myself.  (FYI, all the cabinets and counter-top in these photos fit in and on top of my Honda Fit in one trip!)  That decision was made a little easier knowing that they've actually eliminated formaldehyde (or nearly so) from their products.  See this link.  In fact, the cabinets have no significant smell, unlike the other particle board furniture I bought in the past.

While I'm not a fan of Ikea's no-words instructions, I liked everything else about the experience of designing, buying and assembling and installing the cabinets:
  • I used Ikea's online planner and worked out a few details in the store with their kitchen experts before finalizing my order
  • Once the order was placed, they rolled out all my stuff on three carts.  They had everything on my order and nothing else--no going back to work things out
  • Everything is cut and drilled to precise tolerances so everything fit perfectly
  • I'm used to assemble-it-yourself companies including one extra of all the screws, fasteners, etc.  Ikea counts everything exactly and there were no missing parts
  • This sides of the cabinets are finished (white) so it is optional to add a finished panel to match the front style of the cabinets.  Since my cabinet faces are off-white, I didn't even bother.
  • The drawers and hinges work smoothly and have up-to-date soft-close technology (I paid extra for that)
  • There are many options for the cabinet faces and counter tops, and I found one that I liked.  I was particularly thrilled to find a solid oat laminated counter-top.  I expected this to be hard to find and/or pricey, but not so.
It does take time to do the installation, and there is a bit of a learning curve.  I needed a friend's help the first day to hang the cabinets, but it was a snap to do the drawers and doors myself.  A DIY person may not like the fact that the drawers/doors do not come pre-drilled for handles.  In my case, that was desirable because the hardware I chose had a non-standard 5" screw spacing.  I couldn't even find a drilling guide to buy for that size handle.  No sweat, I built on myself and it worked out fine.

Starting from left to right, since this cabinet abuts a wall.

In my original plan, I was going to build the pantry myself, with the clay plaster walls showing on the left side and back of the cabinet.  Well, time being in short supply I decided to buy the cabinet to move things along and maintain a more consistent look.  However, the wall outlet, which I had planned to be hidden inside the pantry, was now behind the side wall of the cabinet.  I happened to have a 5" hole saw in my toolbox (ask me about that!), so I chose to do that rather than trying to make a precise-looking rectangular jigsaw cut.  Not ideal, but acceptable.

All cabinets installed


I bought a reclaimed undermount sink, so I needed to be super careful cutting out the hole.  I bought a 4" hole saw and drilled the four corners in order to match the 2" corner radius of the sink basin.  You can also see the hole for the faucet.  I'm a big fan of the one-hole faucet with integral sprayer hose.  It make for a very clean look.

Four holes drilled and very carefully cutting out the edges.  My dad happened to have a very precise Makita jig saw with extremely sharp blades.   This is the first tool of it's kind that I can control within a pencil-line width if I cut slowly.

I probably spent an hour and a half cleaning up the hole and rounding off the edges.  Most of that time was smoothing out the rough cut from the hole saw.  My cut-out turned out to be more regular than the sink itself!.  After installation, there are a couple places where the wood and sink are about 1/16" out of alignment, but that's well within my comfort-level for exactitude.

All finished, almost.  I'll be installing a curtain over the lower part of the pantry cabinet and the area under the sink.  The curtain on the pantry is a nod to cost (doors are expensive) and convenience since I want to put a coat rack and shelf on the wall in front of the pantry that would have kept the door from opening all the way.  The curtain under the sink saves the cost of a cabinet and maximizes space.  The idea is that while you're in the kitchen, you slide open the curtain to have instant access to trash, compost and recycling.  There are no doors to get in the way of what I consider to be the most under-considered aspect of the kitchen: waste. When you're done in the kitchen, close the curtain and hide the clutter.  You'll also see that I don't have a built-in stove.  Since this is really a guest house that I plan to live in for a few years before I build the "real house"  I'll make do with a 2-burner counter-top induction stove and a large toaster oven.  This article explains the benefits of induction.  While they are pricey, that are super energy efficient, don't heat up the space in summertime, and have the instant-on/off of a gas stove without the explosion potential. (As a rule of thumb, I try to avoid technologies that explode.)

Sunday, May 21, 2017

Adobe Floor - Top Layer

OK, I've done as much work as I can do before installing the kitchen cabinets, so it's time to lay in the finished layer of adobe floor.

First, one final effort to stabilize the cracks.  I filled the few remaining
void areas with dry sand/clay powder and wet out the entire crack.  Then I  traced
the cracks with a fat popsicle stick, pressing down as hard as my fingers
would allow.  Last, I pounded the crack with a short stick to densify the material as
much as possible.

The pour progressing nicely.  Note the plastic on the walls to protect
against splatters.

Friends had helped me pre-mix 4 batches in the mortar mixer the day before.
(The recipe was 1 bucket clay, 2 3/4 bucket masonry sand, 1/3 bucket chopped straw.)
The goal was to install the entire top layer in one day to avoid having joints show
in areas poured on different days. I ended up needing a total of 8 mixes, but because
this was Monday, I had no help available to parallel process mixing and troweling.

It ended up being a 14-hour day, but I got it done!  Here, is the floor a week later
after drying out.  Unfortunately, it dried out too much.  It was still a little too wet to burnish
on Friday; I was away for the weekend; and this was how it looked on Monday before I did
the burnishing.  I had to use the paint sprayer to re-wet the surface, but it was still
not as good a job as if I'd been able to do it a couple days earlier.

Still a little wet after burnishing, so I walked on the foam boards
to avoid denting or scuffing the surface.  Luckily, there were no
issues with the painters tape damaging the clay wall plaster, so the
plastic came down without drama.

My Cinderella moment: if your hand fits the print in the floor, you own the house!

Tuesday, April 25, 2017

Miscellaneous Interior Tasks

After getting the water and sewer connected in February, I've been ticking off the list of things that need to get wrapped up before I place the final layer of adobe floor:

  1. Trowel on and smooth out the finish pigmented coats of clay plaster on the wall
  2. Have the plumber fit out the water heater, toilet, shower, etc.
  3. Have the electrician finish installing plugs, lighting, etc.
  4. Fit and install the ceiling panels
  5. Install the threshold at the entry door
  6. Hang interior door (there's only one!) and install door handle
These tasks are not quite wrapped up, but I'm getting close.  Here are some visuals:

Ready for action

I just need a rod and shower curtain and I'm ready to go.

Bathroom ceiling before curtain rod.

This part of the ceiling is finished--just a few more
panels to fit behind the camera.

Oak threshold at the entry door.  You can see that the final layer of adobe mix
will bring the floor level up about 3/4" to be even with the threshold
Clay plaster walls are finished.  Note the truth window on the right side,
where you can peer into the interior of the wall and see the
light straw clay infill between the wood studs.