Thursday, December 22, 2016

Attic Panels

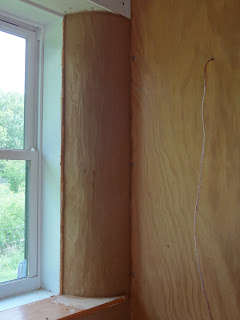
There isn't a whole lot to show off, since the one photo makes it pretty self explanatory.  A few things come to mind:  First, we were pleased with the consistency and uniform finished face of the panels.  I wish I could remember the manufacturer, so I'll have to fill that in later.

Kudos to the framers for making sure the rafters were spaced exactly 24" apart.  Once we lined up the first panel, all the rest of the seems were almost exactly centered on the wood.

Many thanks for Mike W who suggested using a pneumatic stapler to tack the panels up.  He even loaned me his gun and provided the staples.  It made quick work of the job, and I have no concern that the panels will pull away from the framing over time. The tiny heads on pneumatic nails would not have held up.  The staples, for the most part, were set flush with the surface automatically, with only a few needing to be tapped down with a hammer.  My plan is to use an iron-on edge band to cover up the staple heads and joints.

I used a Krieg circular saw guide with my skill saw, using a plywood blade to trim the paneling.  It worked great: fast, and super accurate.  The edges were nearly as clean as the factory edges. 

No more hideous foam insulation to look at! I still need to install some of the trim peices to clean up the corners.

Saturday, December 10, 2016

Bathroom Tadelakt

Tadelakt is not a well-known term.  Simply put, it involves making lime plaster water repellent by working in olive soap.  It is an ancient Moroccan technique that is simply gorgeous within a certain aesthetic.  For more info, you can learn a lot from an internet search or image search.  Feel free to start with this link.

 For better or worse, I am not at the level of craftsmanship to create a showpiece: I am basically treating tadelakt as a substitute for conventional tile because it is a low carbon, natural material.  I wanted the walls to have some color and not all pigments are "lime safe", and I found Earth Pigments to be a great resource.

This shows the final layer of plaster, including the green pigment, being applied to the north wall, below the blocking for the cabinets.  This layer is a couple millimeters thick (about 3 credit cards), which made it much simpler to mix.  Instead of the mortar mixer, which takes an hour to clean, I could do it in a 5-gal bucket.
With such a simple wall, I was done applying the plaster by 10:30.
It took the rest of the day to apply the olive soap, although it was not a continuous process.
FYI, I bought my olive soap from Black Soaps.  The info that comes with the product describes it as a very versatile product, so although I only used 1/10 of the little tub I bought, I'll be able to use it to clean throughout the bath, kitchen, windows, silver items, copper pots, the barbecue, boats, etc.  They even say it makes a great pet soap!

I used a four-step process:

  1. Brush on a 1:20 mix of olive soap mixed in hot water. Polish vigorously with a semi-precious smooth stone.  This step was pretty time consuming (about 2 hours) and actually involved some muscle.  Take frequent breaks to avoid repetitive stress injuries.  Unfortunately, I didn't allow myself enough time to find a proper stone.  This is probably why my tadelakt isn't as shiny as many of the photos I see.  That's not important to me, though: I took a local rounded river-rock stone that had one nearly flat side and polished that one side to be reasonably smooth with wet/dry sandpaper.  Pretty low-tech, but it worked.  I found that my plaster dried pretty quickly, so my polishing was more to burnish the surface of the plaster, rather than to smooth out the larger irregularities.  I was never expecting a shiny, flat surface like a marble counter top, but I'm happy with the slightly irregular, mottled texture.
  2. Brush on a 1:15 mix.  I used an older 2" natural bristle brush that was somewhat frayed and not suitable to cutting in clean edges anymore.  This quality, coupled with a circular motion worked well to ensure that the soap penetrated the complete texture of the plaster, rather than just sitting on top of the high spots.  I did another light polishing with the stone, just to be sure there were no remaining high spots.  Each layer dries progressively slower than the last.  After the first coat, the the top of the wall was  ready for the next coat by the time I finished at the bottom.  The second coat dried a little more slowly, so I used a small plastic bag filled with flour to smooth out the wet spots of olive soap so it would dry consistently
  3. I didn't have to wait long between coats 2 and three: enough time for a snack, stretch, and sit-down.  The third layer was a 1:12 mix and took more time to work in with the flour bag.
  4. By the time the 4th coat came around (also 1:12), the olive soap was sitting on the surface quite a while.  I'd brush on a section around 3-4 square feet, then move on to the next section.  Then I'd backtrack and use the brush to lightly smooth out the olive soap and move on to the third section.  Back tracking again, I'd smooth out the first section with the flour bag, and move on.  After the fourth section, the olive soap had mostly dried, but I'd do a final wipe-down with the flour bag to ensure there were no more wet spots.  Progressing in this way, I'd be working on 4 sections simultaneously.

After the walls were done, it was on to the floor using the same processes.  The only major differences were that this layer was about 3/8" thick (the max thickness for air to properly cure the lime), and I didn't add pigment.  Since this house is partly for demonstration purposes, I thought it would be nice to have some natural-color lime.

Note the extreme texture in the previous floor layer to ensure adequate grip for the finished layer.
I've taped the walls using a laser level to help get a level floor.
More than half done!  The left side, where the toilet goes, is level, and the shower drain on the right is depressed about 1".  I took the time on the previous two layers to depress them in order to keep the finished layer a uniform thickness.  
Done and treated with olive soap.  I used a sponge the next morning to get a rougher non-skid surface that is suitable for a shower.  There was some minor cracking, which I repaired over the next 24 hours by pressing down on the crack and smoothing out the lime.  That's one of the cool things about lime is that it is self-repairing for small imperfections  This process left the floor a little less uniformly smooth, but better to have a non-leaky floor!  
In the end, I can't expect perfection or professional results from myself since I've never done this before.  But after I take a step back, it's just fine and I end up with a special sense of accomplishment!


Tuesday, November 22, 2016

Change of Season

Saturday was one of those gorgeous late November days you dream of having on a weekend: sunny, upper 60's and light wind.  Friends and I spent the bulk of the day happily tackling several tasks on our sailboat.  Until precisely 4:23, when the weather signaled that it was time to quit for the day.  We could hear the wind coming with the cloud bank, and practically instantaneously, the wind increased from a near calm to 30 mph gusts that whipped debris into our fresh paint (damn!).  The temperature dropped 10-15 degrees over the next 30 minutes.

So how is this relevant to the house?  Earlier that day, the interior temp was in the mid 60's.  Sunday, was a brutally windy day (gusts to 40 mph), with a high temp in the mid 40's with mostly cloudy skies.  The house sat un-visited with the windows closed and the heat off.  Monday morning, with the wind still gusting to 30 mph and overnight lows around freezing, I came in around 7:30 to find the interior temperature at 57 degrees.  But at least the sun was out!  By 11:00, the passive solar brought the temp up to more respectable:


I guess the framers were right when they said I'd be able to heat the place with a candle!  Perhaps the more noticeable experience is stepping inside and hearing the noise of the roaring wind diminish to virtually nothing!  The house has no creaks or other indication of the nasty weather outside.  And all thanks to simple stuff like sand, straw, wood, clay and paper!

Tuesday, November 1, 2016

Pigmented Clay Plaster

The plan all along was to use a pigmented finish clay coat as the finished color of the Light Straw Clay walls.  I have enjoyed working with the American Clay products.  They have an easy to follow system, an extensive array of colors to choose from, and best of all--excellent instructional videos on their website.

I'm doing two coats: the first has one packet of pigment per bag of LOMA clay.  This is the roughest mix they have, and is a good base for the final layer, which is finer-grained (Porcelina, in my case).

One tip they list is to use a 7-gallon mixing bucket to avoid creating a mess during the mixing process.  After looking into it, I found this would be hard to source, and relatively expensive.  It turns out, I had a 5 gallon bucket that I had already cut the bottom off of.  Problem solved for free!  I just stuck this in the black bucket and had no trouble mixing, even though I didn't caulk the white extender in place.
You can see the plaster going on, with the darker sections at the bottom right.  This layer is only the thickness of a credit card (about 1 millimeter).  Despite pre-wetting the clay, the clay layers were drying so fast that it was hard to blend the fresh plaster into the previous row.  Perhaps colder temps (it was in the mid 70's and pretty dry), or a better pre-wet would help with this.  Lessons learned for the final layer.  Three test spots are visible on the right.

Here is a closeup of the three test patches in cool, morning light.  The one on the right is what I placed on the walls: one bag of pigment to one 50 pound bag of plaster mix.  Middle is two bags of pigment, and the left is three.

Same test patches in warmer afternoon light.  What would you pick?  I'm going with the middle one.
This shows the first corner at the end of the day, with the sort of splotchy drying in progress.
And the same area fully dried in warm evening light.  With a flash, this looks very washed out, so I didn't include that photo. 

I'm quite pleased with how the transition came out between the drywall above the window and the clay plaster on the Light Straw Clay.  Thanks to Kate for the glass art!

Wish I'd cleaned off the window sill for the picture.  I wanted the wood to protect the corner, figuring it would be prone to damage.  In the end, I think I prefer the look of the solid wood window sill that I built in the kitchen and bathroom.
This is also a preview for the next post: Tadelakt


Thursday, October 13, 2016

Lime Plaster Floor

It turns out I didn't take any photos of the lime plaster straightening coat; only videos that are too large to post.  But that's really not particularly interesting since it's basically just a reprise of the clay straightening coat, complete with burlap reinforcing over the studs to avoid cracks.  You can sort of get an oblique look: it's the darker plaster on the walls in the photos below.

A component of the straightening coat included the first layer of plaster on the floor.  I wanted to make sure the walls and floor were laid in one day so the corner joint would cure in one piece.  This should go a long way to avoiding leaks.  Given the extra stress on the floor, I've screwed down expanded metal lath with the screws tying everything into the underlying adobe floor.

EML screwed down and the floor is ready for plaster.  The EML will then be sandwiched between the first and second plaster layers.

The first layer of floor isn't 100% cured, so I knelt on foam blocks to spread my weight out.
By spreading the plaster on the un-cured first layer, I'm hoping to get a better bond between the two layers to effectively encapsulate the EML.

Second layer is complete with groves creating a good key for the third and final layer.

Overview, showing the still-curing straightening coat on the wall to the left.  The other walls only have one coat, which is fully cured with the exception of the bottom few inches.  This bit was done at the same time as the first floor layer to ensure a continuous corner joint (see above).

Thursday, September 29, 2016

Lime Plaster - First Coat

First off, a word of caution: lime plaster is caustic and you won't even feel it burning your skin.  It's not instantaneous, so you have time to neutralize any lime that gets on your skin with vinegar (which is acidic and neutralizes the basic lime).  Keep a bucket of 1 part vinegar to 10 parts water at the ready to clean yourself at regular intervals, and your tools before the lime starts to harden on them.  Wear eye protection when mixing the plaster, thick chemical gloves when working with it, and long sleeve shirts, and long pant at all times.

This is not intended to be a complete list of safety precautions: you MUST research how to work with lime plaster safely before embarking on these techniques.  Hopefully I have instilled a respect for the material and the importance of knowing how to work with it safely.

Now, on to the fun!  There were two aspects to the first coat.  First was to coat the light straw clay (LSC).  This was done the same way as the first coat of clay plaster: take handfuls of plaster in your gloved hands and mash it onto the surface of the LSC.  The intention is to get it fully bonded into the straw; we'll worry about making it flat in the next step.  I didn't take photos of this step in-process, since it is the same as clay plaster.

LSC covered in lime plaster.  Note that the wood sill and lintel have been taped off--
a precaution that I didn't need to take with the more benign clay plaster.
 The second task was to get a coat of lime plaster bonded to the lath.  Starting from the top, each trowel-full would get worked up into the last batch.

Note that I taped off the blocking at the top of the wall to maintain a clean line.
Make sure to press hard enough to squeeze the plaster through the lath.

Plaster is finished and relatively smooth.  Grooves were cut into all plaster
with a hair pick, just as I did with the clay plaster (Thanks again for that idea, Bob!).  Those pipes are stub-outs for the shower fixture.
I didn't plaster all the way to the bottom of the wall so I could staple the expanded metal lath to strengthen the
wall-floor transition.  I'll want to make this in one continuous pour  to minimize the potential for leaks at the corner.

Thursday, September 22, 2016

Lime Plaster Preparations

It's been a while, eh? I ended up taking off a good chunk of the summer for various reasons, but it's time to take advantage of the more reasonable temperatures and get back to work! This post is all about preparing the bathroom for lime plaster. Unlike clay plaster, lime can stand up to regular wetting once it is waterproofed with olive soap (more on that later). Below are various photos I took along the way.

Getting started at the bottom showing the tools of the trade.  

Note the short bits of lath used to provide the gap between sticks.

I placed two nails at each stud location: the first was with the nail gun,

which is quick and avoids splits in the ends.  The second was a stainless ring nai hammered by hand.
The larger head and extra gripping power is good protection against the final
wall pulling off from the studs in one big sheet.

Some areas couldn't be nailed due to the steel plates

that protect the plumbing.
This plywood section covers up the blocking that is in place
to support any cabinetry I may want to install in the future.
(I'm planning to build a bank of shelves to start with.)

Blocking between the i-joist flanges will get painted to match.
This will make  for nice finished look at the top of the wall, with the
ceiling panels sitting on top.

A temporary stop to create a clean edge for the lime.  After the wood strip
is removed, the final adobe will be toweled flush with the lime.

Making sure I don't drop any gobs of plaster  in the toilet riser pipe.

I made a small lath mock-up and spread a
test mix to see what it feels like.

I was especially curious to see how hard it is to achieve the "key",
where the plaster oozes through the slits in the lath.  Once hard,
this really locks the plaster onto the lath.


Tuesday, June 28, 2016

Interior Doors

Pretty quick when there are only two in the whole house! 

You can see that I pulled off the moldings that came with the doors.
I'll be using 1x3s to create a custom molding in a pattern that (hopefully) works with my various plywood, built-in, and tongue-and-groove wall components.

Clay Plaster Straightening Coat is DONE!

There's not a lot for me to say about these, but note that I used a flash which washed out the clay color a bit.  It's browner and warmer than it looks here.  The final thickness is about 3/8 of an inch and I'd estimate that it's flat to within 1/8 of an inch.  The idea isn't to get this layer picture-perfect.  #1, that would involve much more skill than I have, and certainly more patience.  #2, the final pigmented layer will cover up the blotchiness and some of the smaller imperfections.  #3, clay plaster is supposed to have natural variations and texture: it's organic, not manufactured.

Looking northeast (future kitchen)

North wall with blocking for wall cabinets

Looking northwest

West wall

Note the wet clay (darker) on the South wall to the left

South wall

Closeup of a window round before final smoothing

Detail around the electric panes, showing the transitions to drywall.
These will get further smoothing with drywall mud

This is how I blocked out the truth window.  The plexiglass is screwed in,
and this 1/2 thick styrofoam form is taped in place to allow me to create a clean
line with the straightening coat.

Porthole screwed in place on top of the still-soft straightening coat to
mold the clay to fit to the metal rim.

Porthole closed
(See what the clay looks like in natural light, rather than with a flash?)

Saturday, April 23, 2016

Clay Plaster - Scratch Coat

I'm finally starting on the clay plaster!  I've enjoyed the Light Straw Clay (LSC), but I've also been looking forward to covering it up.

This is the before photo.  Note the 3/8" plywood at the top of the wall covering the blocking for the kitchen cabinets.  The plaster will be flush with this.

 luckily, the mortar mixer fired up after several months of non-use without major drama.  Clay: this is the same clay soil I used for the floor, screened through 1/2 wire mesh, soaked in a bucket for several hours (several days is better), and given a preliminary mix with my double auger mixer.  Concrete sand (vs masonry sand)  is used because it has varying grain sizes that lock together more compactly.  I'm still not sure about the wheat paste: it didn't seem to make the mix stickier or more workable, as is claimed.  That will warrant some further experimentation.  One mix is enough to keep one person busy for the rest of the day. This turned out to be five 5-gallon pails filled 1/2 full.

Ready to start applying.  The LCS has been pre-wet to the right of the taped electrical box.  I used my paint sprayer, just spraying potable water and that turned out to be a great way to get controlled coverage (and good for me to practice my wrist technique).  I made one pass 10 minutes or more before stariting, and a second pass right before plastering.  I started out using the trowed to apply the plaster to the wall, but we quickly found that hands work better.

Two sections done.  This is called the scratch coat, as I'll explain later.  The goal is to get the best possible adhesion to the LSC, so we paid the most attention to pressing the plaster into the interstices of the LSC. Apply a handful smearing it up the wall.  Get a section roughly coated, and then come back and press it down with a sort of jiggly motion to lock it into place.  (Same as applying lime plaster to lath.)  The downward motion leaves some lumpiness that is easy to smoothout with some light upward or sideways strokes.  

We put some effort into leaving a uniform thickness, which is really pretty easy if the wall was well formed.  These sections were quite flat, but some later sections were less regular, so the scratch coat sort of half evens out the variations.  The straightening coat, coming next, will finish that process.  This scratch coat was only just thick enough to cover the majority of the straw.  Just a few stalks are left visible on the surface.

The corner was a bit of an experiment.  I started from the top with expanded metal lath stapled into the wood studs.  The lath started out thick at the top (3" per wall) and got progressively thinner toward the bottom.  You can see about 2" per wall in this photo.  The very bottom involved burlap placed into a thin layer of wet plaster.  You can see that it's pretty wavy, and it was a pain to get it to wrap the corner, so I'm leaning toward the lath as my final solution.  Since this corner is in my pantry closet, I'm less concerned with the look of it.

Regarding the exposed studs, I will deal with them with the straightening coat.  First, I'll place a skim coat of plaster over the wood, bridging the adjacent scratch coats.  Then I'll press a 6" strip of burlap into that wet mix and let it dry for several hours or perhaps overnight.  Then I'll come back  and lay the scratch coat over the entire wall, getting it as smooth and level as I have the desire and patience for.


 So that's what we completed by the end of the day.  Not too shabby, and more rewarding than the adobe floor, which involved a lot of loud mixing and laborious troweling.Clay plaster is still laborious, but at least you are standing up about 2/3 of the time.

The final task is to scratch up the surface to give leave a good texture for the next layer to adhere to.  Unfortunately, my closeup photos didn't come out.  At Bob's suggestion, I tried out a hair pick and it was the perfect tool!  Just pull horizontally and you get a nice pattern of 1/16" to 1/8" grooves.  I tried a diamond pattern, but that seemed to rough up the mix too much.

This is the wall after two days of drying.  I find it interesting that two of the sections are notably wetter than the others, since they all seemed to be the same thickness of clay.  I guess not.  In the  darker panels, you can see the scratch patterns: diamond on the left, and horizontal on the right. After 4 days, it was completely dry.  Interior conditions were in the low 60's with relatively low humidity.