Wednesday, November 25, 2015

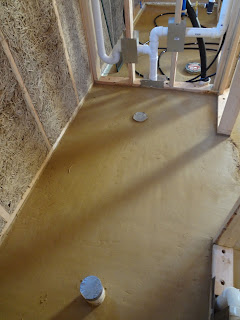
Adobe Layer 2

After dealing with cracking in the first layer of the floor, I wanted to refine my sand/clay ratio, so I tried three more samples at 0.83:1, 1:1, and 1.25:1 rations.  Here are the results after 17 days of drying:
Sample 1
 #1 Obvious failure: too much clay caused it to shrink and crack.


Sample 2
#2 Not too bad, but still a few cracks.


Sample 3
#3 Almost no cracks. Is this the one? I thought I'd try a fourth mix with still more sand to see.

Sample 4
#4 Formed one week after sample three, this one had cracked pretty significantly after only 10 days. So the winning recipe is 1.25 parts sand to part clay.


Most of the first day was spend in the bathroom, sloping the floor to drain to the shower drain and getting a level surface near the toilet. There is still a 1/2” layer of lime plaster to go on top, but I wanted to be relatively precise so that layer can be relatively uniform in thickness. I also wanted to practice creating an attractive, sloped surface.


Here is the main room after day two. Things are moving along much faster with the 1 1/2” layer as compared to the 4” layer! Hopefully the dry-time will be less. Even though the house is closed up, my desiccant dehumidifier appears to be doing a great job of sucking out moisture and warming the room.


Monday, November 23, 2015

Radiant Tubing

I am SO looking forward to experiencing radiant heat!  Think about it: warm feet, nearly constant temperatures with low energy input, no filters to change, no noisy and uncomfortable air blowing out of ducts, no worry about whether there is mold growing in your ducts: the advantages are many.  And in a house this size, it is so simple: There is only one run of 250 feet of pipe, so no manifold and network of thermostats.


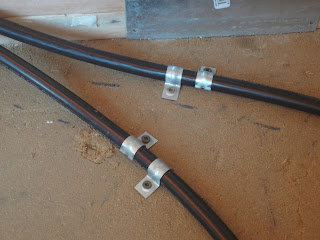
The  1/2" diameter PEX tubing was pretty easy to install, even though my friend and I were near the bottom of the learning curve.  (This would be a tough task to accomplish solo.) We spent a couple hours learning that the 1 1/2" tapcon screws were having trouble holding in the adobe base layer, which is noticeably softer than concrete.  Solution: 3" course-thread deck screws driven straight down with no pilot hole.  Not one of those has pulled out.  True, we didn't pull the tubing into quite as small a radius as we might have otherwise, but I don't think there will be any downside.


The only place were we doubled on clips up was where the tubes transition from the floor up the wall to the heater/pump assembly.  You can see the blemish in the adobe where one of the tapcons pulled out.

So next step is to bury the tubes in a 1 1/2" layer of adobe.  That thickness makes it easy to use 2x3s laid flat as screed boards.  The entire adobe assembly consists of the base 4" layer, the next layer at 1 1/2", and the 1/2" finish layer for a total of 6".  That's a lot of thermal mass!  So I'll basically set the thermostat once in the fall and leave it untouched until the end of spring at the end of heating season.

Saturday, November 7, 2015

Adventures in Shingling

So after the rain event, I had eight working days to make as much progress installing the cedar shingles as possible before leaving on vacation.  Sure, it's been 25 years since I last did any shingling, but I thought I could make a good bit of progress.  True, I needed the framing guys to install all the trim, and I wanted to pre-paint it while it was easier before the shingles went up.

28 bundles of shingles
I just about broke my trailer getting the shingles back from the building supply store.  Luckily, they are about 1/10 of a mile from home.

Well as usual, life and work got in the way, and I had to keep revising down my expectation for how much of the house I'd get covered.  In the end, I finished the north wall, and told the framers that if they have some extra time in between other projects, they were free to come down and make whatever progress they could make.

So upon returning from vacation, this is what I found--like someone had picked up my little shack and replaced it with a finished home!


This was a total thrill to see!  There's still a little left do do on the west side.  See that little unfinished bit on the gable?  That took over 6 hours to wrap up yesterday.  I do good work, but I'm slow.  I figure I must have gone up and down the ladder to the roof about 80 times, so if nothing else I got a good workout!

Tar Paper Before the Storm

Sorry for the delayed posting--I got distracted by a much needed vacation!  Rewinding the clock about a month, though, East Coast folks may remember a five days of cold, damp drizzle that culminated in a nor'easter.  That week, I was in major stress mode trying to get the tar paper up to keep the sheathing dry.  I managed to do it in between damper periods, working solo.  Thank goodness for my well-behaved hammer stapler and long overhangs that kept the walls relatively dry even during the light precipitation.  Here's how it looked as of Thursday October 1, just before the major rain moved in that night.


With the house in a short-lived stealth mode, I was ready for the forecast 5-7 inches of rain with tarps, to avoid erosion under the eaves and haybale check dams to slow down the flow of water along the driveway in front of the house.  Luckily, we didn't get nearly that much precip, and it ended up being a slow steady rain rather than a gully-washer.